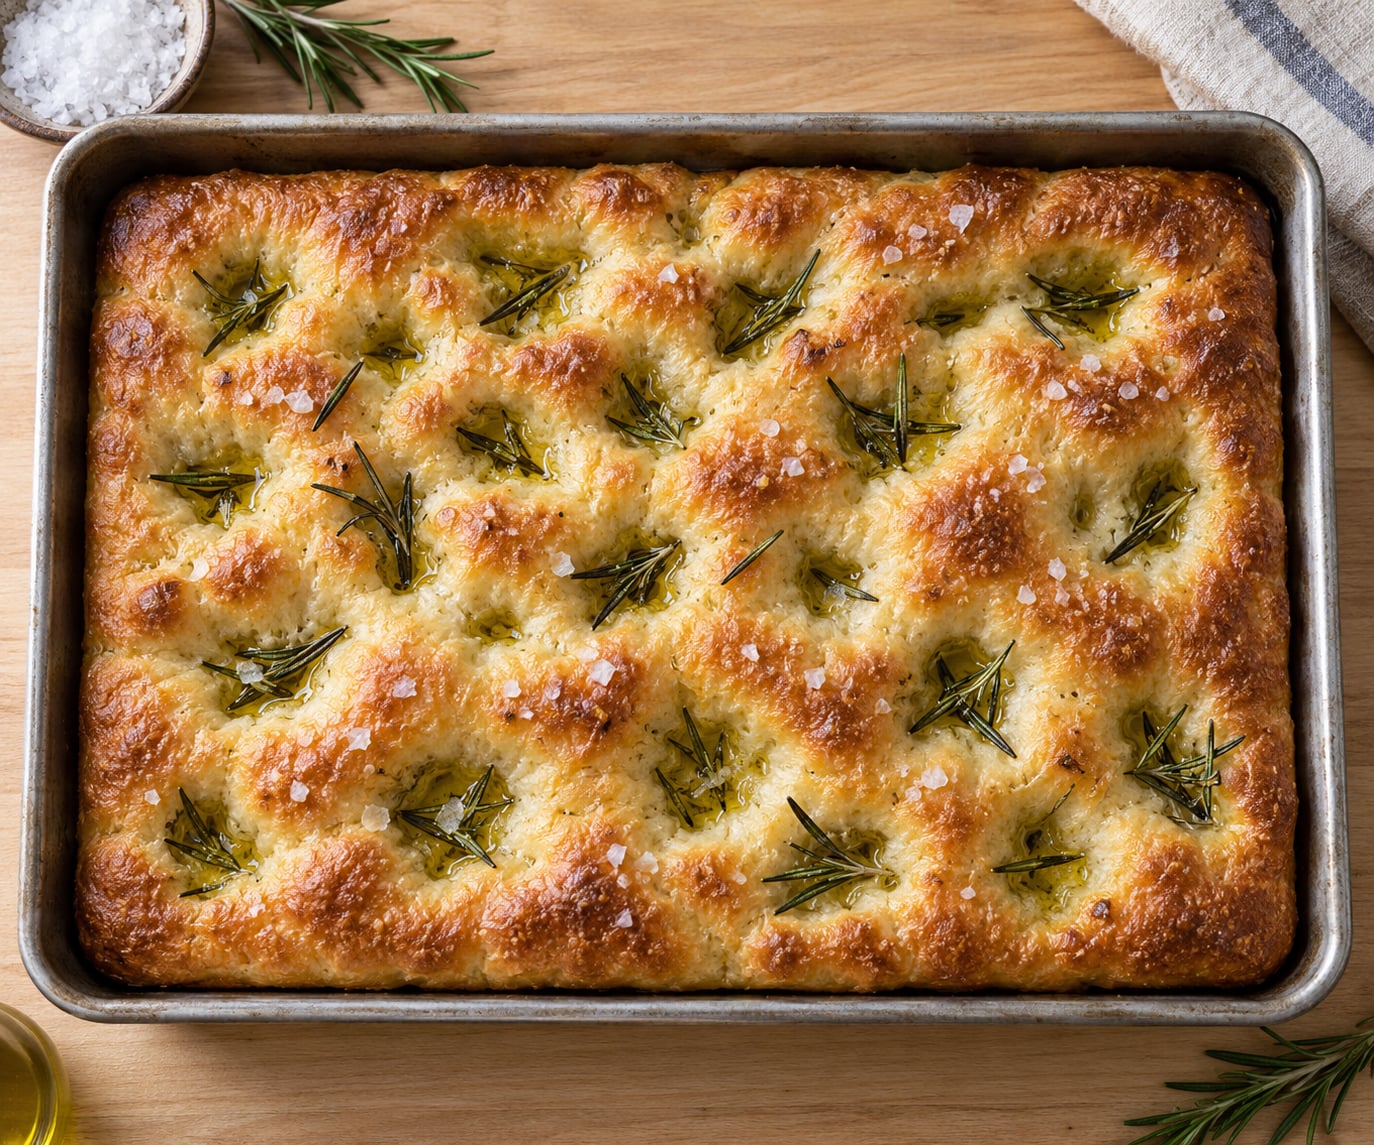
Dimples are finger impressions pressed into panned focaccia dough in the last two minutes before baking. Oil your fingertips, press straight down with the pads of your fingers until you feel the bottom of the pan, and space them roughly a finger-width apart in a staggered grid. Then fill the holes with olive oil and flaky salt and bake hot until the edges go deep golden.
That is the whole technique, and it is the part most recipes skip. The dough is the long project; the dimples take about two minutes and decide whether you get a flat, even Italian flatbread or a smooth domed slab with no character. The photo everyone is copying comes out of the oven with visible oil pooling in every hole, which only happens if the dough is proofed, the finger pressure is right, and you do not press so hard that you flatten the loaf.
Updated for October 2026. Works with commercial yeast or a sourdough starter, at home in a home oven, no special equipment.
Table of Contents
- What You Need
- Step-by-Step
- Step 1: Activate the Yeast
- Step 2: Mix and Knead the Dough
- Step 3: Let the Dough Rise
- Step 4: Fold and Rise Again
- Step 5: Press the Dimples
- Step 6: Add Toppings and Bake
- Common Mistakes
- Frequently Asked Questions
- How deep should the dimples be in focaccia?
- Should focaccia dough rise before pressing the dimples?
- How do I stop the dimples from closing while the dough rises?
- What type of flour is best for focaccia with dimples?
- Why are my focaccia dimples not visible?
- How can I make focaccia with a crisp bottom and edges?
- Conclusion
What You Need
For a standard 9 x 13 inch (23 x 33 cm) rimmed metal baking pan, this is a complete dough that produces a focaccia about three-quarters of an inch thick. It is wet and slack on purpose, because slack dough spreads into the corners and holds big open air pockets instead of tearing when you press it.
- 500 g (4 cups) bread flour or all-purpose flour. Bread flour gives more structure and a slightly chewier crumb; all-purpose works and is more forgiving.
- 400 g (1 2/3 cups, room temperature) water. That is 80% hydration, the sweet spot for dimples. Cooler water slows the rise and gives you more working time.
- 10 g (2 teaspoons) fine sea salt or kosher salt.
- 4 g (1 1/4 teaspoons) instant yeast, or 2 g if you are using a very active starter.
- 3 tablespoons extra virgin olive oil in the dough, plus 3 to 4 tablespoons for the pan and the surface.
- Flaky sea salt for the top. Regular salt dissolves into the surface; flaky salt stays visible and cracks when you bite it.
You need very little equipment: the pan, a bowl, a wooden spoon or stand mixer, a pastry brush or your hands for oiling, and a rack to cool on. A dough scraper makes transferring the dough to the pan far easier, and a 9 x 13 pan beats a rimmed quarter sheet if dimple depth is your goal, because a smaller pan means a thicker slab.
For oil, use extra virgin olive oil. A heavier oil coats the pan well but loses the flavor, and a light olive oil blend has no aroma once baked. For flavor additions, put rosemary, thyme or stripped sage leaves into the dimples, press cherry tomatoes or halved olives into the holes, or scatter grated Parmesan and a sliced pepperoni over the top in the last five minutes of the bake.
Step-by-Step
How to make focaccia with dimples comes down to six steps, and only one of them is tricky. Work through them in order, and check the visual cue at each stage rather than trusting the clock alone.
Step 1: Activate the Yeast
Stir the yeast and 4 g of the flour into 100 g of the water. Wait ten minutes and look at the surface. It should be foamy with a ring of bubbles at the edge and slightly domed, not flat. If it looks like plain water, your yeast is old and you need a fresh packet.
You can skip this step entirely if you stir the yeast straight into the dry flour, but the test costs you nothing and it saves a wasted afternoon.
Step 2: Mix and Knead the Dough
Add the remaining flour, salt and the rest of the water to the activated yeast mix and stir until no dry flour is left. The dough will look shaggy and sticky. That is correct, and it is the stage most beginners over-correct on.
Knead by hand for 6 to 8 minutes on a lightly floured surface, or run a stand mixer on low for 5 to 6 minutes with a hook. You are looking for a change in feel: the dough goes from tearing and sticky to smooth, elastic and only slightly tacky. Pull a small piece and stretch it; it should thin without snapping. If the dough tears instead of stretching, knead another two minutes. If it is sticky after that, rest it covered for 15 minutes and knead again, which lets the flour hydrate and loosens the dough rather than adding more flour.
Step 3: Let the Dough Rise
Transfer to a lightly oiled bowl, cover, and let it rise until it has roughly doubled and shows bubbles along the sides, typically 60 to 90 minutes at 70 to 75F (21 to 24C). In a warm kitchen it can go in 40 minutes; in a cold one, two hours. Volume and a domed top are the cue, not the timer.
If you want to control the timing precisely, watch the dough rather than the clock and aim for a 50 to 75% rise. Focaccia that is slightly underproofed at this stage bakes with more flavor, but dough that is badly underproofed will spring back hard and push your dimples out. Overproofed dough loses the gluten tension that holds a dimple, so it is worth erring on the early side.
Step 4: Fold and Rise Again
Do one coil fold: with oiled hands, lift one side of the dough, stretch it up without tearing, and fold the center over itself, then turn the bowl a quarter and repeat three more times. Each fold builds gluten strength and traps pockets of gas, which is where the airy crumb comes from. Let the dough rest 15 minutes after folding so the gluten relaxes and stops resisting your hands.
Now the second rise, 45 to 60 minutes more, until the dough feels full of air and jiggles when you shake the bowl. Marie Asselin’s shorthand is that it is ready when it looks almost too puffy. That is the moment to move it into the pan.
Oil your 9 x 13 pan generously with 2 to 3 tablespoons of olive oil and spread it up the sides with your fingers. Turn the dough into the pan and use a dough scraper, or your oiled knuckles, to gently stretch it toward the corners without pressing down or deflating it. Let it settle uncovered for 20 to 30 minutes, until it has relaxed into the pan and filled the corners. This pan rest is a second rise, and it is what makes the dimples hold.
Step 5: Press the Dimples
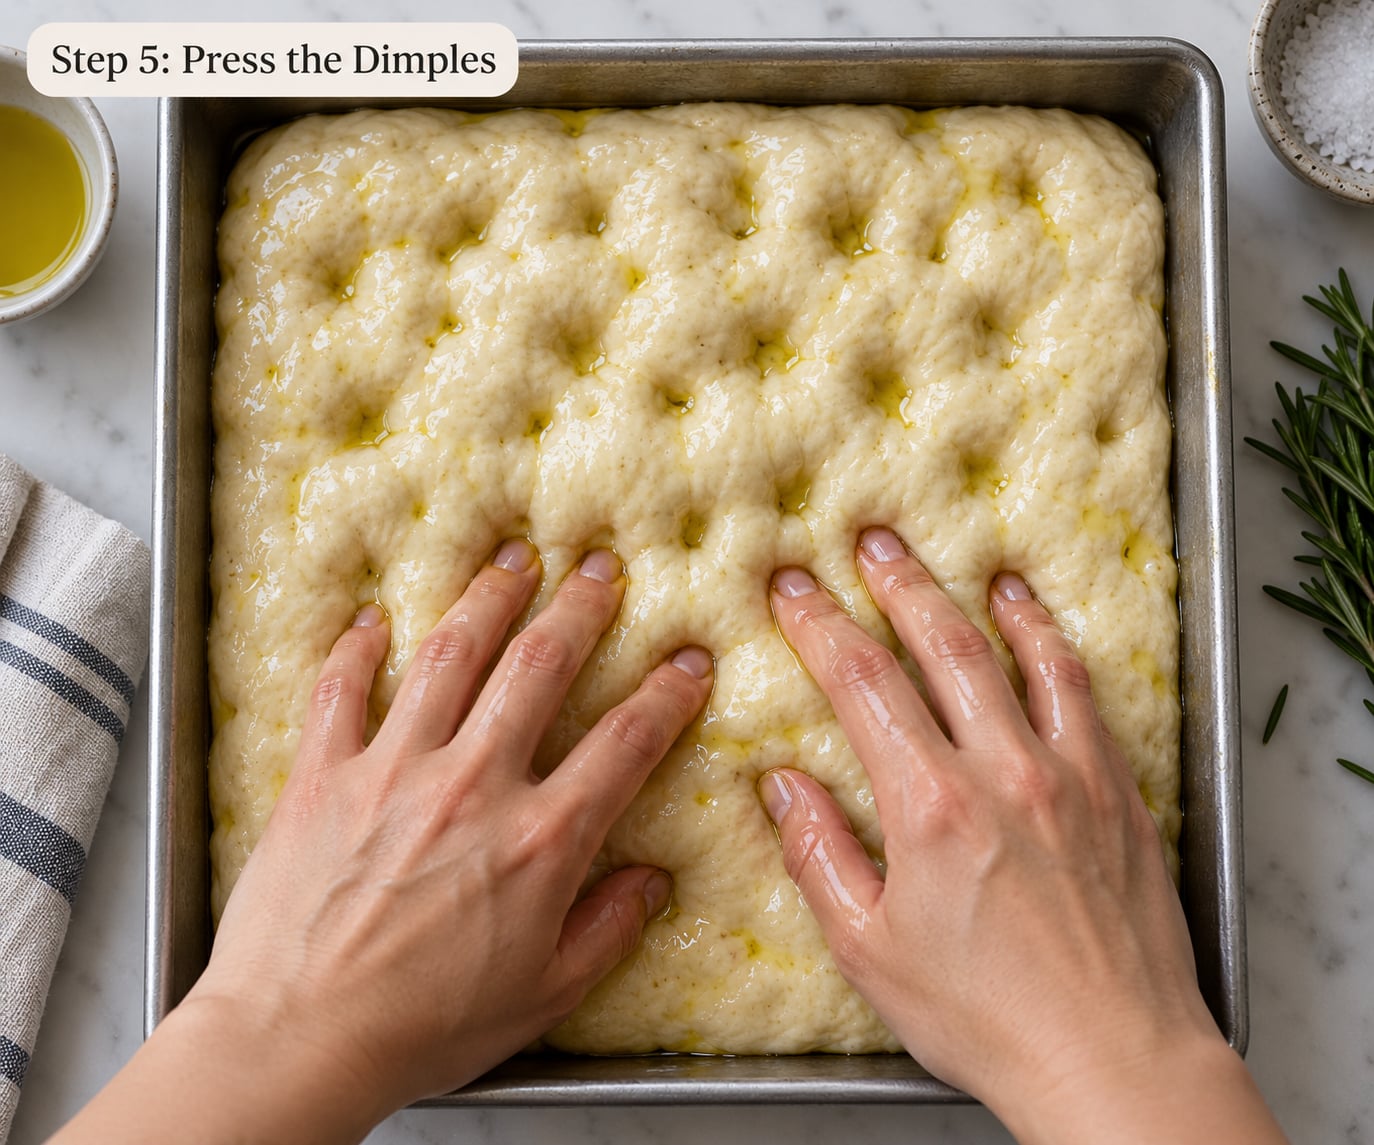
Oil your fingertips rather than wetting them. Dry or floury fingers drag and tear the surface, while water alone makes the dough stick to your skin and to the pan. Oil gives you a release surface and leaves extra oil in the dimple, which is the flavor you are chasing.
Press with the pads of your fingers, not the tips, and go straight down without dragging. Space the dimples about a finger-width apart in a staggered grid, so each one sits in the valley between two of its neighbors. They should be close together but not touching. A straight row of dimples leaves weak seams that can tear open in the oven; a staggered grid distributes the tension.
How deep? Press until you feel the pan bottom on at least half of them, then use about half that pressure on the rest. If the dough is very slack or 100% hydration, stop short of the bottom so you stretch the surface into the dimple rather than punching a hole through it. The goal is a network of connected dimples, not a colander.
Two things to avoid. Do not press hard enough to deflate the loaf, which is the classic overproofed-dough failure. And do not dimple, cover, and walk away for an hour; the dimples relax and partly close while the covered dough keeps rising, which is why a short 10 to 15 minute rest is the most and a long one is not. Re-oil your fingers whenever they start to drag.
Step 6: Add Toppings and Bake
Drizzle 1 to 2 tablespoons of olive oil over the dimpled surface, letting it pool in the holes, then scatter flaky sea salt. Press herbs, cherry tomatoes or olives into the dimples now, so they sit in the pockets and do not slide off in the steam.
Bake in a preheated oven at 450F (230C) for 20 to 25 minutes, or until the top is golden brown and the edges are deep brown and firm. The center should spring back lightly when you press the crust with a fingertip. A pale focaccia has not finished; a dark one has gone too far, and the fast browning usually means the top is done before the middle sets. If the top colors in under 15 minutes, drop to 425F (220C) for the rest of the bake.
Cool in the pan for 10 minutes before turning out. That rest firms the bottom and makes the focaccia far easier to release, and it is the difference between a clean lift and a torn sheet.
Common Mistakes
Almost every dimpling problem traces back to dough temperature, dough state, or pan preparation. The matrix below pairs the symptom with the cause and the fix, because people usually arrive here after a loaf that came out smooth and flat.
| What went wrong | Likely cause | Fix |
|---|---|---|
| Dimples spring back and vanish | Underproofed dough with gas pressure and gluten tension pushing out | Proof 30 to 45 minutes longer next time, press again right before the oven, and do not skip the pan rest |
| Dimpling deflates the whole slab | Overproofed dough, pressed too hard | Press only halfway, use lighter fingers, and bake immediately instead of resting |
| Dough too sticky to handle | Wet dough and wet fingers | Oil your fingertips instead of wetting them, rest the dough 15 minutes, and back off flour a little on the next mix |
| Surface tears instead of dimpling | High hydration or dough too cold and tight | Warm the dough, stretch rather than push, and press with two fingers at once |
| Dimples shallow and random | No spacing plan, pressing by eye | Mark the staggered grid with your fingertips first, then press each one straight down |
| Focaccia sticks to the pan | Pan under-oiled, or dough underproofed | Pour oil in and spread it up the sides, then cool 10 minutes in the pan before turning out |
| Top browns fast, center soggy | Oven too hot or dough too thin | Drop to 425F (220C) and keep the dough about three-quarters of an inch thick in a 9 x 13 pan |
| Toppings slide off | Added loose on the surface | Press each one into a dimple so it is held by the dough walls |
One more failure worth naming: forgetting to dimple at all. If the dough is still in the pan and unbaked, dimple it now. If it is already in the oven, pull the tray out, dimple the top quickly, and put it back; you lose a few minutes of heat and gain the texture. If it is baked, the bread itself is still good, and a brush of olive oil with flaky salt after baking gets you most of the way there.
Two dough problems show up alongside dimpling failures. If your dough is not elastic after kneading, it is either under-kneaded or too warm; give it another two minutes of kneading, and if it tears rather than stretches, bulk ferment it and fold again later. And overproofed dough is not a write-off: dimple it gently, press only halfway to the pan, skip the post-dimple rest, and bake it straight away, which is exactly why focaccia is the traditional home for a dough that has gone past its prime.
Frequently Asked Questions
How deep should the dimples be in focaccia?
Press until you feel the bottom of the pan on about half of your dimples, then use roughly half that depth on the rest. On slack or 100% hydration dough, stop just short of the bottom so you stretch the surface rather than punch through it. Pressing straight down with the pads of your fingers, without dragging, is what keeps a dimple from tearing shut.
Should focaccia dough rise before pressing the dimples?
Yes. Dimple after the second rise, while the dough is in the pan and puffy, and give it a short 10 to 15 minute rest afterward before baking. Dimpling earlier and then letting the dough rise fully lets the dimples relax and partly close. The one exception is overproofed dough, which should be dimpled gently and baked immediately.
How do I stop the dimples from closing while the dough rises?
Keep the post-dimple rise short. Ten to 15 minutes is enough for the dimples to set; an hour covered with plastic wrap lets them soften and close. Oil the surface right after dimpling, which leaves a film the rising dough cannot grab onto, and press the dimples once more lightly just before it goes in the oven if the dough puffs back up noticeably.
What type of flour is best for focaccia with dimples?
Bread flour gives a stronger gluten network and more open air pockets, which helps dimples hold their shape. All-purpose flour works well too and is more forgiving, and it produces a slightly softer crumb. Whatever you use, the hydration matters more for dimpling than the flour: 75 to 85% is the range where the dough stretches into dimples instead of tearing.
Why are my focaccia dimples not visible?
Most often the dough was underproofed, so gas pressure and gluten tension pushed the dimples back out during the bake. The second cause is pressing too shallow or too lightly, so use oiled fingers and press until you feel the pan bottom. A third cause is a hot oven darkening the top before the indentations can set, so try 425F (220C) for the last part of the bake.
How can I make focaccia with a crisp bottom and edges?
Bake it hot, at 450F (230C), in a pan with a generous coat of olive oil spread up the sides, and keep the dough thick enough to fill the pan. A 9 x 13 inch pan with 500 g of flour gives about three-quarters of an inch of height. Cool it 10 minutes in the pan before turning out, and reheat the whole loaf at 400F (200C) for 5 minutes to bring the bottom back.
Conclusion
The order is what matters: get the dough properly proofed, oil the pan, stretch it in without deflating it, let it settle, then dimple with oiled fingertips in a staggered grid and press until you feel the pan bottom. Oil and flaky salt go into the holes, and a short rest of 10 to 15 minutes sets them before a hot bake at 450F (230C) for 20 to 25 minutes.
Start with a 9 x 13 inch pan, 500 g of flour, 80% hydration, and an hour of patience on the second rise. Get that one right, and the dimples take care of themselves.