To render duck fat at home, chop the duck skin and fatty trimmings into small pieces, add about a quarter cup of water per pound, and simmer everything over medium-low heat for 45 to 60 minutes. When the water cooks away and the fat turns from milky to clear and golden, strain it into a jar and refrigerate.
Rendering just means melting the fat out of the skin. Nothing else happens, no special equipment required, and it costs nothing but a little time and patience.
The reason it’s worth doing: what most cooks scrape off the roasting pan is the best cooking fat you can put in a pan. It handles high heat without smoking, it carries a deep savory flavor, and it keeps for months in the fridge. One whole duck can leave you with several cups of it.
Table of Contents
- What You Need
- Step-by-Step: How to Render Duck Fat at Home
- Preparing the Duck Skin
- Melting the Fat Slowly
- Knowing When the Fat Is Ready
- Straining and Storing the Rendered Fat
- Common Mistakes
- Frequently Asked Questions
- How long does it take to render duck skin at home?
- Can you eat the duck skin after rendering it?
- How much duck fat should I expect from one batch of skin?
- Why did my rendered duck fat turn dark or smell bitter?
- How long can rendered duck fat be stored in the refrigerator?
- Can I freeze rendered duck fat, and how should I thaw it?
- Conclusion
What You Need
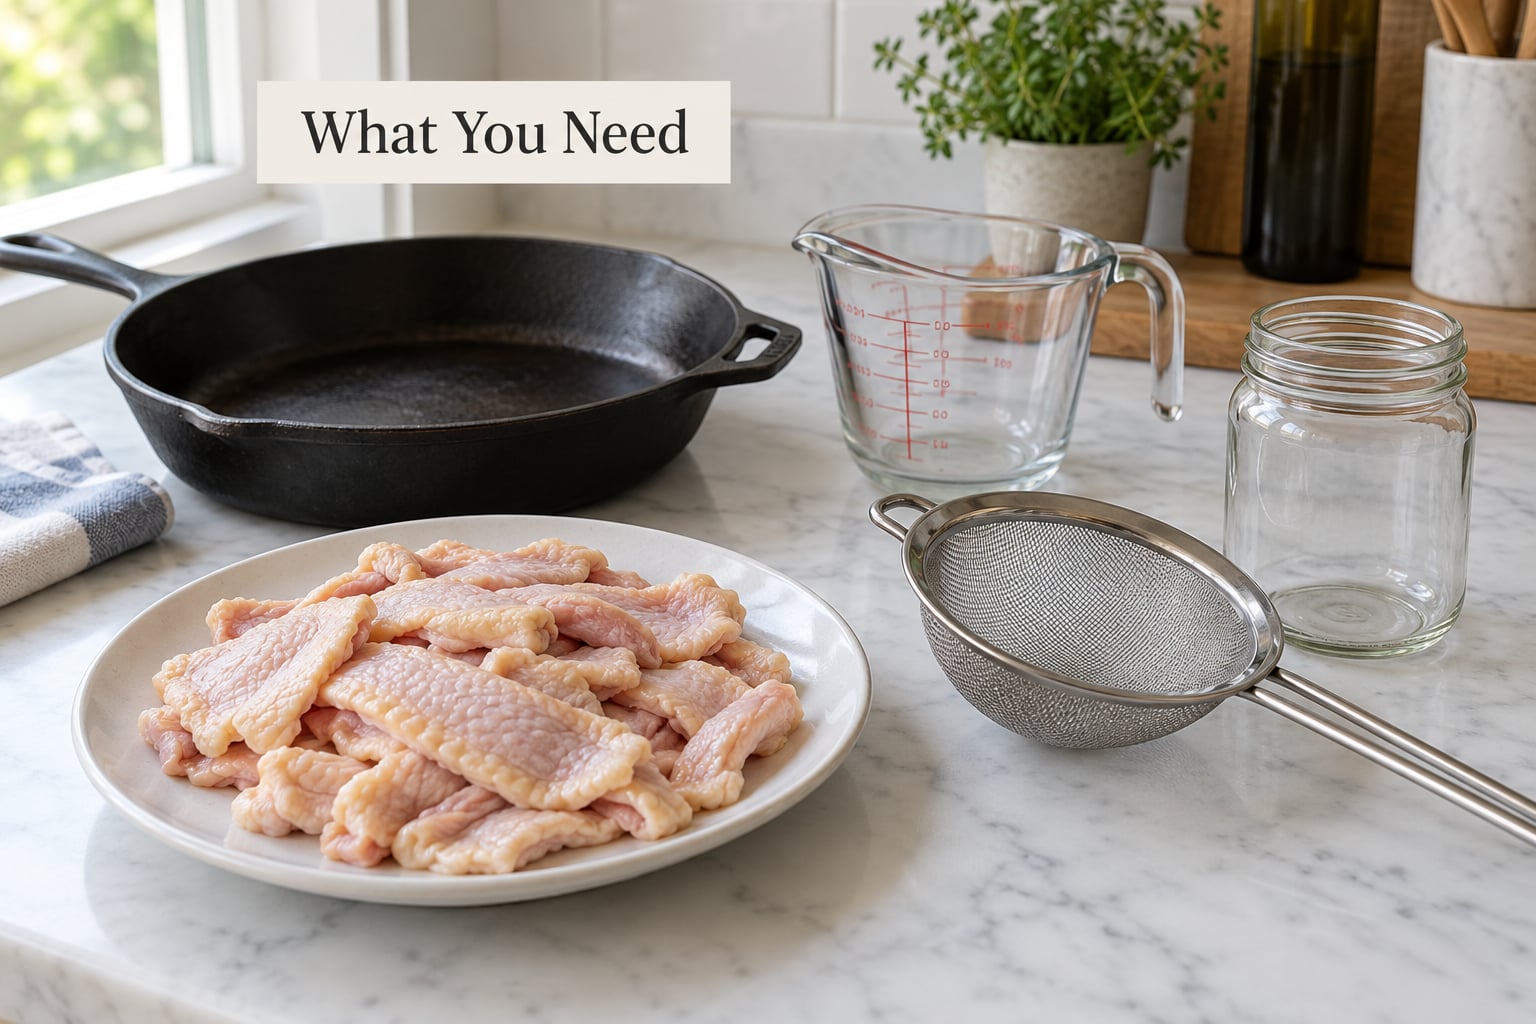
The list is short, and most of it you already own. The one thing worth buying if you don’t have it is a heavy skillet or Dutch oven with thick walls, because a thin pan is the main reason rendering goes wrong.
- Duck skin and fatty trimmings. The skin off the breast and legs is the richest source. Save the bits of fat cap that trim off the breast, and the fatty bits from around the cavity. One whole duck gives you roughly 1.5 to 2 pounds of skin and fat combined.
- A heavy-bottomed skillet, Dutch oven or tall pot. Heavy is the important word. Thin sheet-metal pans scorch the solids before the fat finishes coming out.
- A big pot for batch rendering. If you’re doing a whole bird at once, a tall pot holds the volume and lets you keep a splash of water in without everything crowding against the sides.
- A slotted spoon or tongs for pulling out the cracklings.
- A fine-mesh strainer, or a sieve lined with paper towels. The paper-towel version catches the last flecks and leaves you with a clearer result.
- A heatproof measuring cup and a clean glass jar with a lid. Wide-mouth mason jars work well because you can scoop fat out with a spoon later.
Optional, for flavor: a tablespoon of coarse salt, a few smashed garlic cloves, or a couple of sprigs of rosemary or thyme. Add these to the fat while it is still warm and they infuse it as it cools. Don’t add them at the start of the simmer, because they will scorch along with everything else.
Step-by-Step: How to Render Duck Fat at Home
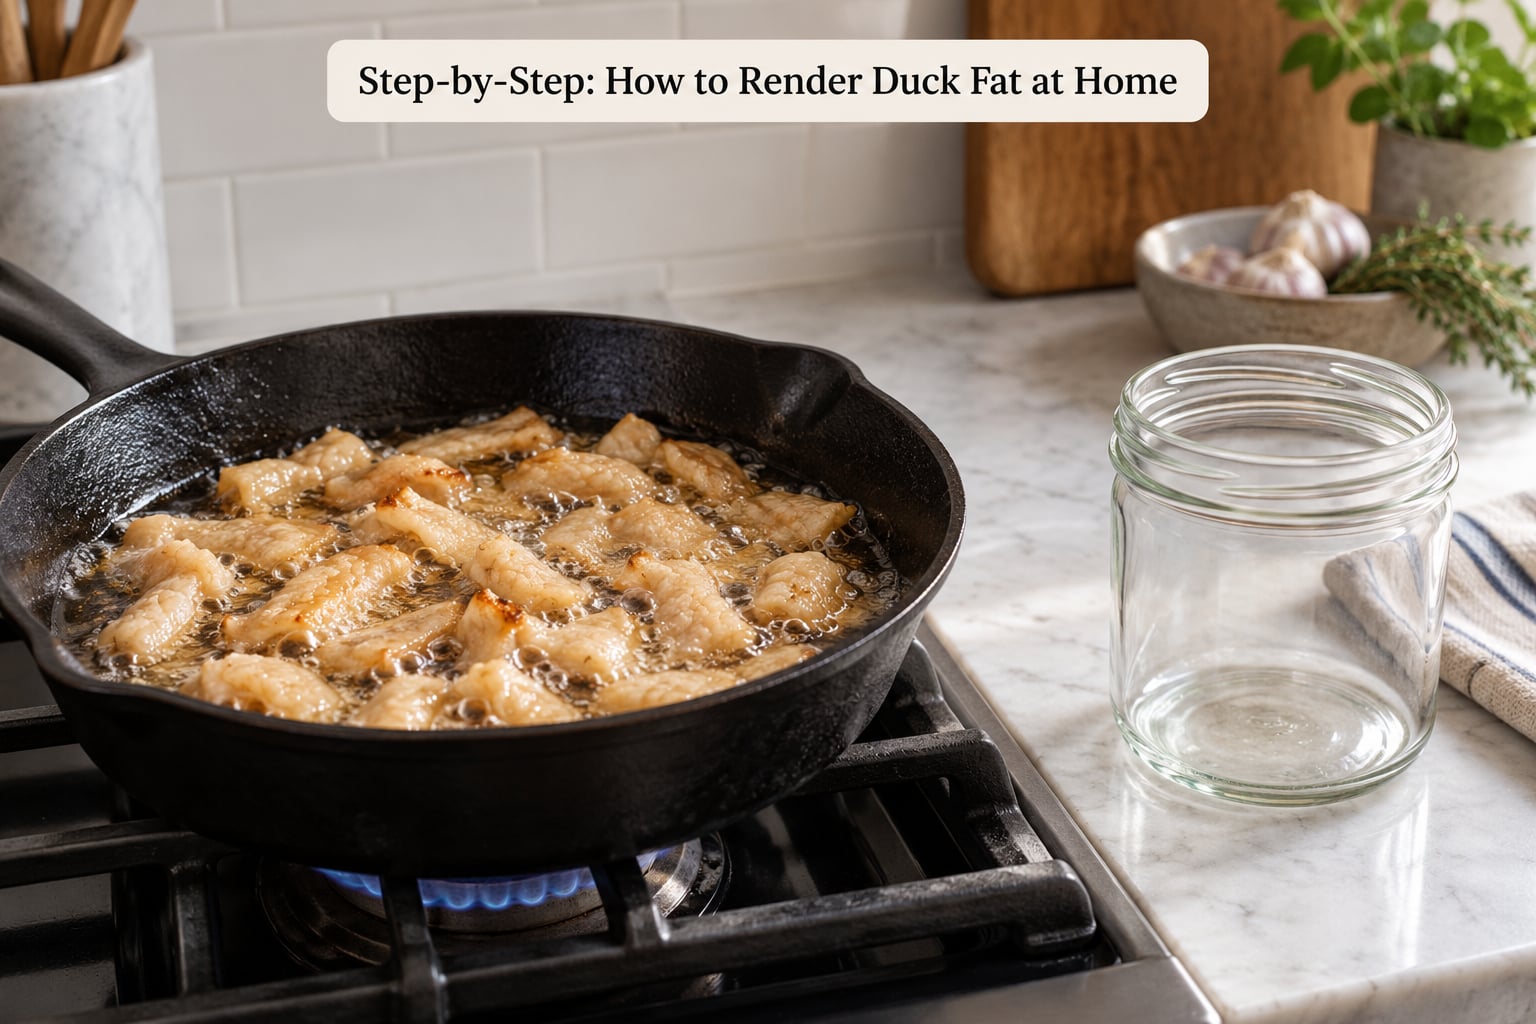
The wet stovetop method is the one to learn first. The water is doing the real work here: it holds the temperature near 212F while the fat releases, which means the skin can’t burn even if your burner is a little hotter than you meant it to be.
Allow 45 to 60 minutes of cooking time for about a pound of skin, plus cooling time before you can safely handle the jar.
Preparing the Duck Skin
Lay the skin out and check every piece. Pull off any feathers you missed with a pair of tweezers, and trim off the layer of meat that clings to the underside of breast skin. That meat does not render into anything useful, it just adds water and protein that browns and smells off in the finished fat.
Cut the skin into pieces roughly one inch square. Smaller than a quarter inch and you get more browning, which means more crackling and slightly darker fat. One inch is the sweet spot: enough surface area for the fat to come out, big enough that the pieces don’t turn to charcoal before they’re done.
Dry the skin properly. If you just cooked a duck, blot the pieces with a paper towel and let them sit uncovered for fifteen minutes or so. Damp skin releases water into the pan, and that extra water keeps the fat cloudy instead of clear. It’s the least glamorous step and probably the one that improves your result the most.
Salt is optional. A light sprinkle of coarse salt on the skin side before it goes into the pan seasons the cracklings and draws a tiny amount of moisture out of them. If you’re flavoring the fat rather than the cracklings, leave it off.
Melting the Fat Slowly
Put the pieces in the heavy pan, skin side down where they’ll fit. Add roughly a quarter cup of cold water per pound of skin and fat, which should come roughly level with the top of the pile. Bring it up to a bare simmer over medium-low heat, so you see small bubbles around the edges and a lazy movement across the surface, not a rolling boil.
Put the lid on ajar rather than fully closed, so steam can escape. Expect the whole thing to take 45 to 60 minutes, and expect it to make noise but not to smell much like cooking for most of that time. The rendering happens quietly.
Once the water drops below the level of the fat, start scraping the bottom of the pan with a wooden spoon. This is the moment rendering goes wrong most often. The solids settle onto the metal, the fat around them gets hotter than the water was holding it at, and you start getting brown specks in the fat and a scorched smell.
For a big batch from a whole duck, use the oven instead: heat to 350F, spread the skin in a single layer on a rimmed sheet pan, and let it go for 45 to 60 minutes until the pieces shrink and brown. The oven is more forgiving and needs no attention, though you’ll get slightly less fat because some of it stays in the skin.
The dry skillet method, with no water at all, is the fastest. It’s also the one that scorches most often, and it leaves a cloudier fat because water retained in the skin mixes into the liquid. Use it when you have a few minutes of attention to spare, not when you’re making a batch.
Knowing When the Fat Is Ready
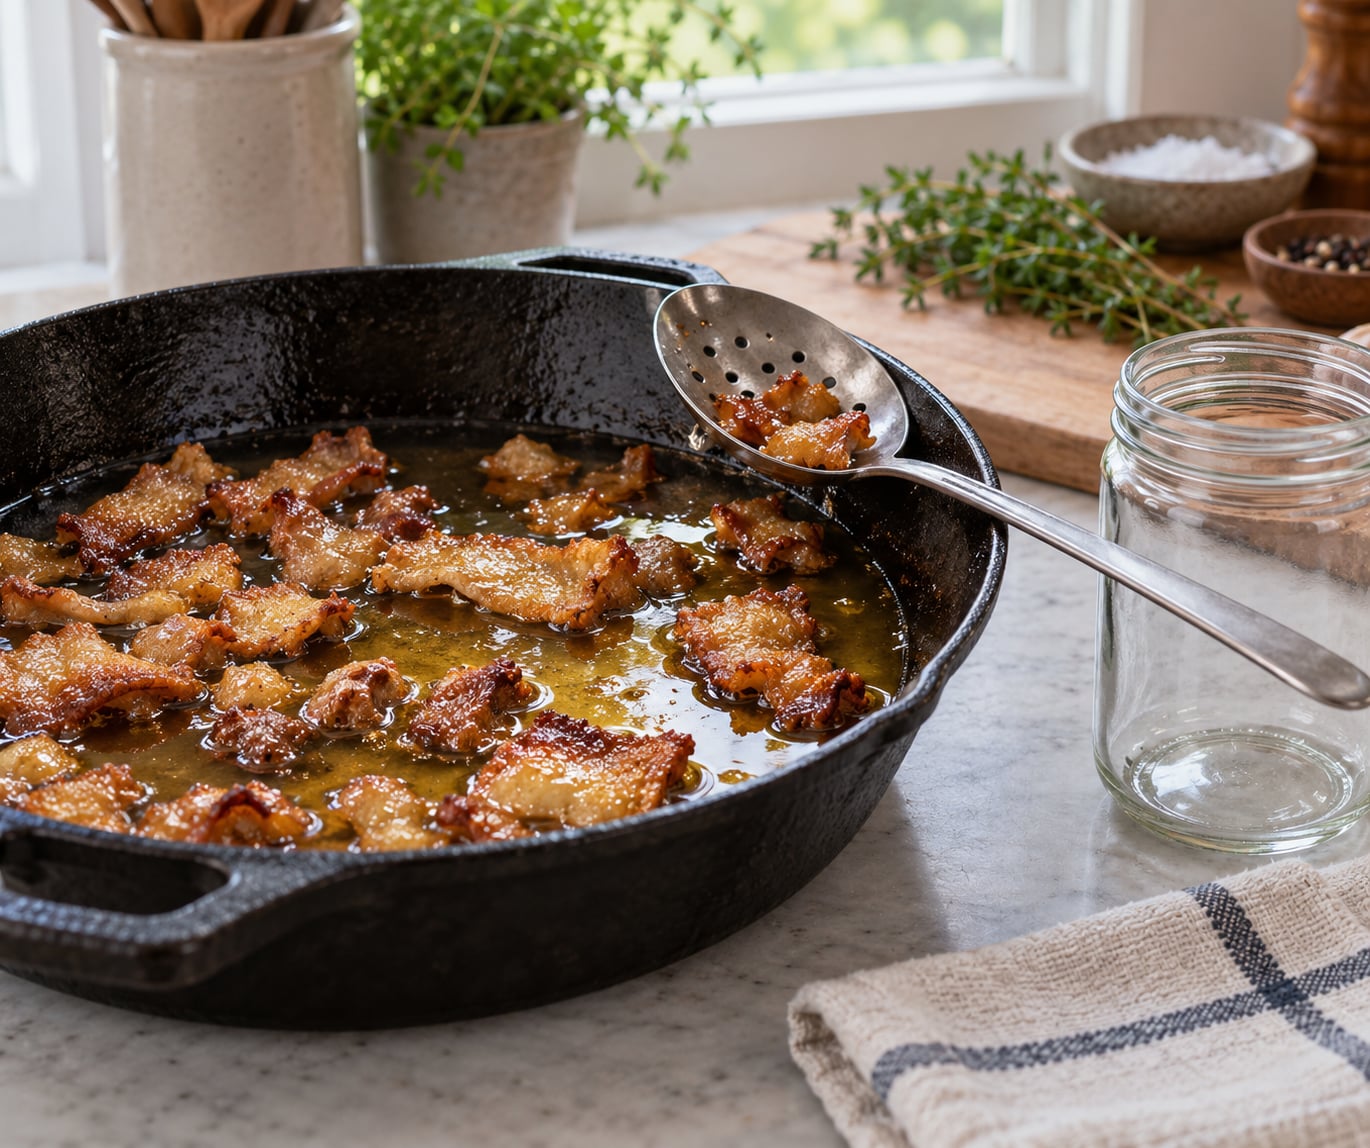
Look for three things at once. The fat should have gone from milky or opaque to clear and golden, matching the color of light olive oil. The skin should have shrunk noticeably and gone golden-brown all the way through. And the water should be gone.
If the liquid is clear but there’s still water in the pan, keep going. If the fat is still cloudy and there’s no water, that fat is done rendering, it just rendered without water holding the temperature down, and you can strain it as it is. Cloudy fat is not spoiled and it is perfectly safe to use.
Watch for the smell. Good rendering smells warm and meaty with a little nuttiness. The moment you get a sharp, acrid, burnt smell, stop and pull the pan off the heat, even if some skin is still pale. Bitter, dark, thin-tasting fat comes from scorching those solids, and no amount of straining takes it back.
Straining and Storing the Rendered Fat
Lift out the cracklings with a slotted spoon and spread them on a paper towel to crisp while you finish up. Then strain the warm fat through a fine-mesh strainer, or through a sieve lined with paper towel, into a heatproof measuring cup.
Pour it into a clean, completely dry glass jar. Let it cool on the counter until it’s no longer steaming, then seal it, label it with the date, and move it to the fridge.
One safety note that matters more than any other tip in this guide: rendered fat is far hotter than boiling water. Never pour it into a cold or thick-walled jar. It can crack the glass, and a spatter of fat that hot will burn skin badly.
| Method | Time | Batch size | Fat clarity | Attention |
|---|---|---|---|---|
| Wet stovetop (recommended) | 45 to 60 min | 1 to 2 pounds | Clear and golden | Constant at the end |
| Oven sheet pan | 45 to 60 min at 350F | Several pounds | Golden, slightly less yield | None, but pan space is limited |
| Dry skillet | 20 to 30 min | 1 pound or less | Cloudier, keeps water | Constant throughout |
| Rendering while cooking the breast | Adds nothing extra to the cook | 1 breast | Small amount, fine quality | Drains every few minutes |
That last row deserves more attention than it gets. If you pan-sear a duck breast, score the skin, start it in a cold pan skin side down over medium-low heat, and drain the released fat every few minutes into a jar, you get a small quantity of very clean fat and a crisp skin at the same time. No extra cooking step, and the fat is better for it. It is also the only way most people ever collect enough for a steady supply without dedicating an afternoon.
How to store the finished jar:
| Storage | Unopened or newly sealed | Opened and used regularly |
|---|---|---|
| Refrigerator, airtight and dark | Up to 6 months | 4 to 6 weeks before you want to sniff and taste-test it |
| Freezer, leaving headroom in the jar | A year or longer | A year or longer |
| Counter, in a warm kitchen | Not recommended | Don’t |
Label the jar with the date you made it. It takes five seconds and it’s the difference between knowing whether something in the back of the fridge is two months old or two years old.
Common Mistakes
Almost every disappointing batch comes down to heat, moisture, or crowding. Here are the six I see most often, and what to do instead.
1. Running the heat too high. The instinct is to make it faster. Frying the skin instead of rendering it gives you brown, bitter bits in the fat and a finished jar that tastes thin. Keep it at a bare simmer and let the clock do the work.
2. Not drying the skin first. Water left on the skin ends up in the finished fat and keeps it cloudy. It shortens shelf life too. Blot and air-dry for fifteen minutes.
3. Crowding the pan. If the pieces are packed solid with no room for water to circulate, the ones on the bottom cook unevenly and stick. Use a bigger pot, or do the batch in two rounds.
4. Forgetting to scrape once the water is gone. This is the one that ruins batches. Set a timer when you think the water is halfway down and start scraping.
5. Pushing past the smell. Sharp and acrid means stop, even if the skin still looks pale. Bitter fat cannot be fixed.
6. Pouring into a damp jar. Any water in the container gives bacteria somewhere to start and dulls the flavor. Use a jar that has been rinsed and dried completely.
A few things worth doing with what comes out of the pan:
Season the cracklings while they’re hot with flaky salt, or with salt and a little smoked paprika, and eat them like chips. They crisp up more as they cool, which makes them a good thing to have going while you do something else.
For an infused fat, warm a cup of the strained liquid with garlic, rosemary, thyme, or a strip of orange peel for ten minutes, then strain again and jar it separately. Label that one too, since flavored fat goes off faster than plain.
And use the fat. Duck confit starts with a good pour of it covering the meat. So do potatoes roasted in it, French fries, popcorn, eggs, mushrooms, and any green vegetable that needs a fast, hot sauté. Its smoke point handles searing without complaint, which is exactly why it works as a butter substitute for basting or for frying bread.
One last habit: skim the cracklings out after each cook, or pour the fat through the strainer back into the jar before it cools. A jar that stays clean will give you several uses before the flavor turns. When it does start tasting flat or develops a stale, oily smell, that’s your signal, not the calendar.
Frequently Asked Questions
How long does it take to render duck skin at home?
Allow 45 to 60 minutes for the wet stovetop method with about a pound of skin, plus 30 to 60 minutes of cooling time before the jar is safe to handle. The oven sheet pan method takes a similar 45 to 60 minutes at 350F with no attention needed. The dry skillet method is faster at 20 to 30 minutes but needs constant watching.
Can you eat the duck skin after rendering it?
Yes, and most people treat it as the best part. The rendered skin becomes cracklings: small, shrunken, golden-brown and crisp once it cools. Lift them out with a slotted spoon, spread on a paper towel, season while hot with flaky salt, and they eat like chips. Check each piece for any that stayed pale and rubbery, since those render best.
How much duck fat should I expect from one batch of skin?
Expect roughly one and a half cups of clear fat per pound of trimmed skin, and a little less from fatty trimmings alone. A whole duck usually yields between one and a half and two pounds of skin and fat, which works out to around three cups of finished fat. Yields drop in the dry skillet method because some water stays trapped in the skin.
Why did my rendered duck fat turn dark or smell bitter?
Both almost always mean the solids scorched. Once the water evaporates it stops holding the temperature down, so the pieces sitting on the pan bottom cook well past done and turn bitter and dark. Scrape the bottom of the pan once the water drops below the fat, keep the heat at a bare simmer, and stop the batch the moment you notice an acrid smell.
How long can rendered duck fat be stored in the refrigerator?
Kept airtight in a dark jar and refrigerated, freshly sealed rendered duck fat stays good for up to six months. Once you start scooping from it for regular cooking, treat it as a four to six week fat and sniff it before using. If it smells flat or stale rather than meaty, toss it. Freezing it and thawing a scoop at a time works well for longer storage.
Can I freeze rendered duck fat, and how should I thaw it?
Yes, and it freezes well for a year or longer. Leave an inch of headroom in the jar because fat expands as it freezes, or pour it into silicone molds for one-cup cubes you can drop straight into a hot pan. Thaw a cube in the refrigerator overnight, or set the jar in warm water for fifteen minutes. Never microwave it.
Conclusion
Start by trimming and drying the skin properly, since that one habit fixes more problems than any other step in this guide. Then simmer it slowly with a quarter cup of water per pound until the water is gone, the fat is clear and golden, and the skin has shrunk into deep golden cracklings.
Strain the fat while it’s still warm, pour it into a clean dry jar, let it cool, seal it, label the date, and refrigerate. Skim out the cracklings after each cook so the jar stays clean and the fat keeps tasting fresh for as long as it lasts.