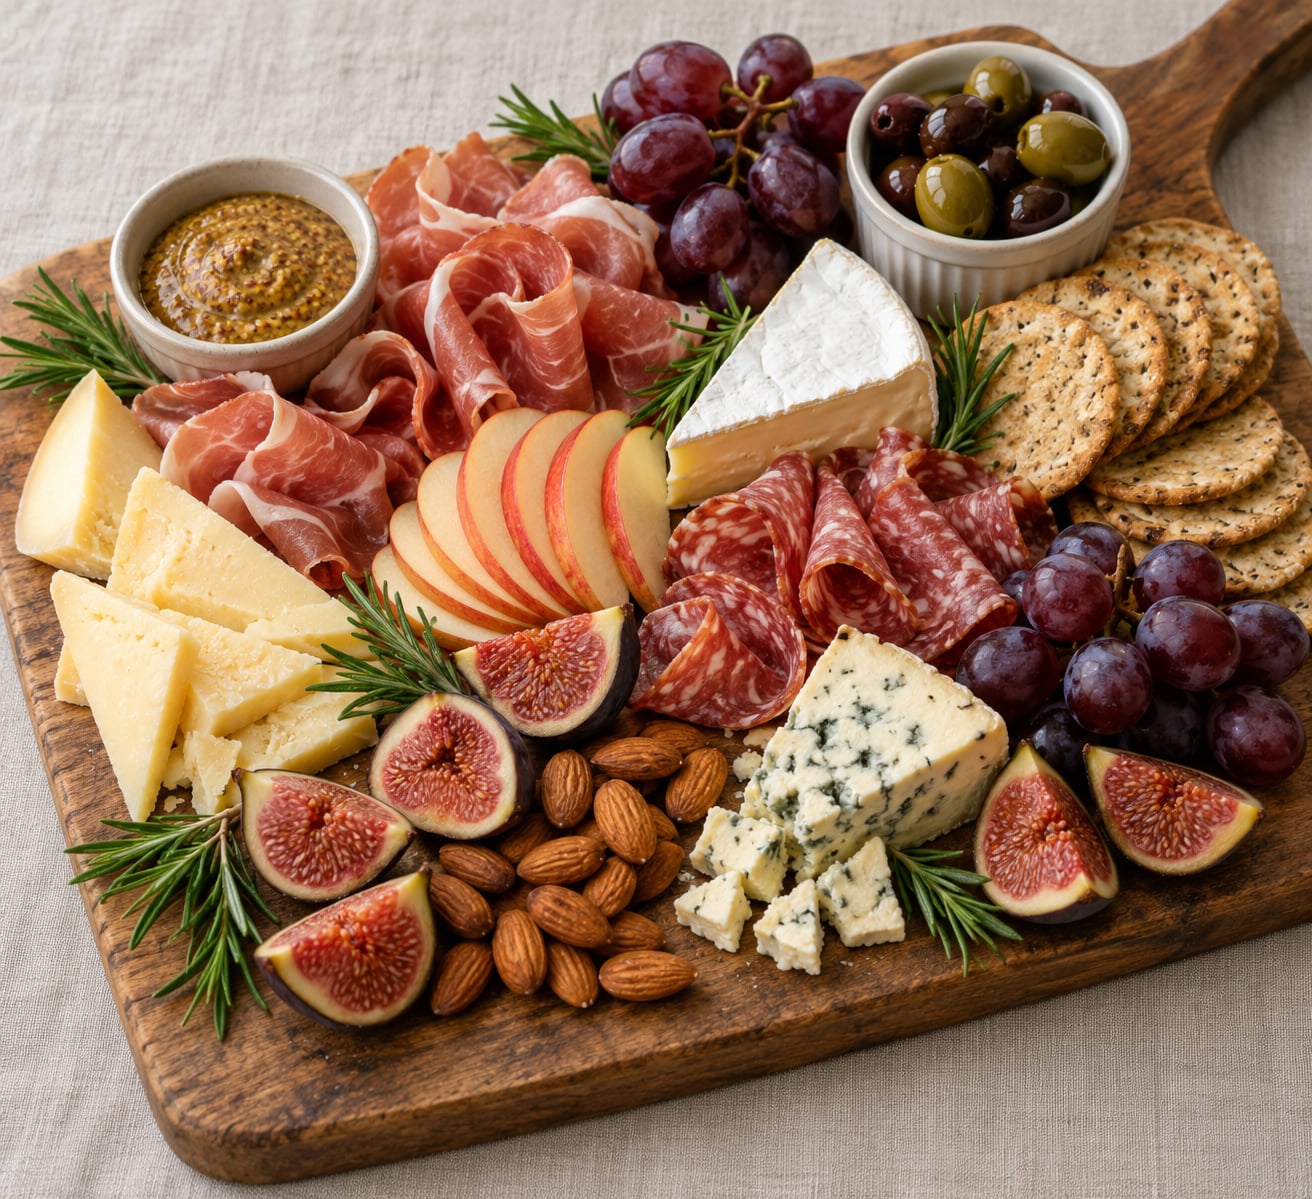
A charcuterie board that looks full has food spread across nearly its whole surface in clear groups, with tall bits standing up, contrasting colors next to each other, and only small pockets of bare wood. You get there by buying fewer items than you think, grouping them into zones, and using shapes and small bowls to occupy the space a flat layout wastes. It takes about 30 minutes to assemble once the food is out.
The mistake almost everyone makes is buying a huge board and a big pile of food, then setting it all down in one layer. The result photographs like a sparse table, because a flat single layer with cubes of identical cheese reads as small portions no matter how much food is actually there. This guide, updated for 2026, works the other way: pick a limited mix with real contrast, then place it deliberately.
Table of Contents
- What You Need
- Step-by-Step
- How to build a charcuterie board that looks full with varied portions
- Step 1: Plan the board around color and contrast
- Step 2: Use a mix of shapes, sizes, and textures
- Step 3: Arrange in sections instead of scattering everything
- Step 4: Add height and fill the empty spaces
- Step 5: Finish with fresh and edible garnishes
- How far ahead can you assemble a charcuterie board?
- Common Mistakes
- Frequently Asked Questions
- What is the 3-3-3 rule for charcuterie boards?
- How to make a charcuterie board look full?
- Should I use a smaller board so the charcuterie looks fuller?
- How far ahead can you put together a charcuterie board?
- How much charcuterie do I need for 20 people?
- What is the best finish for wood charcuterie boards?
- Conclusion
What You Need
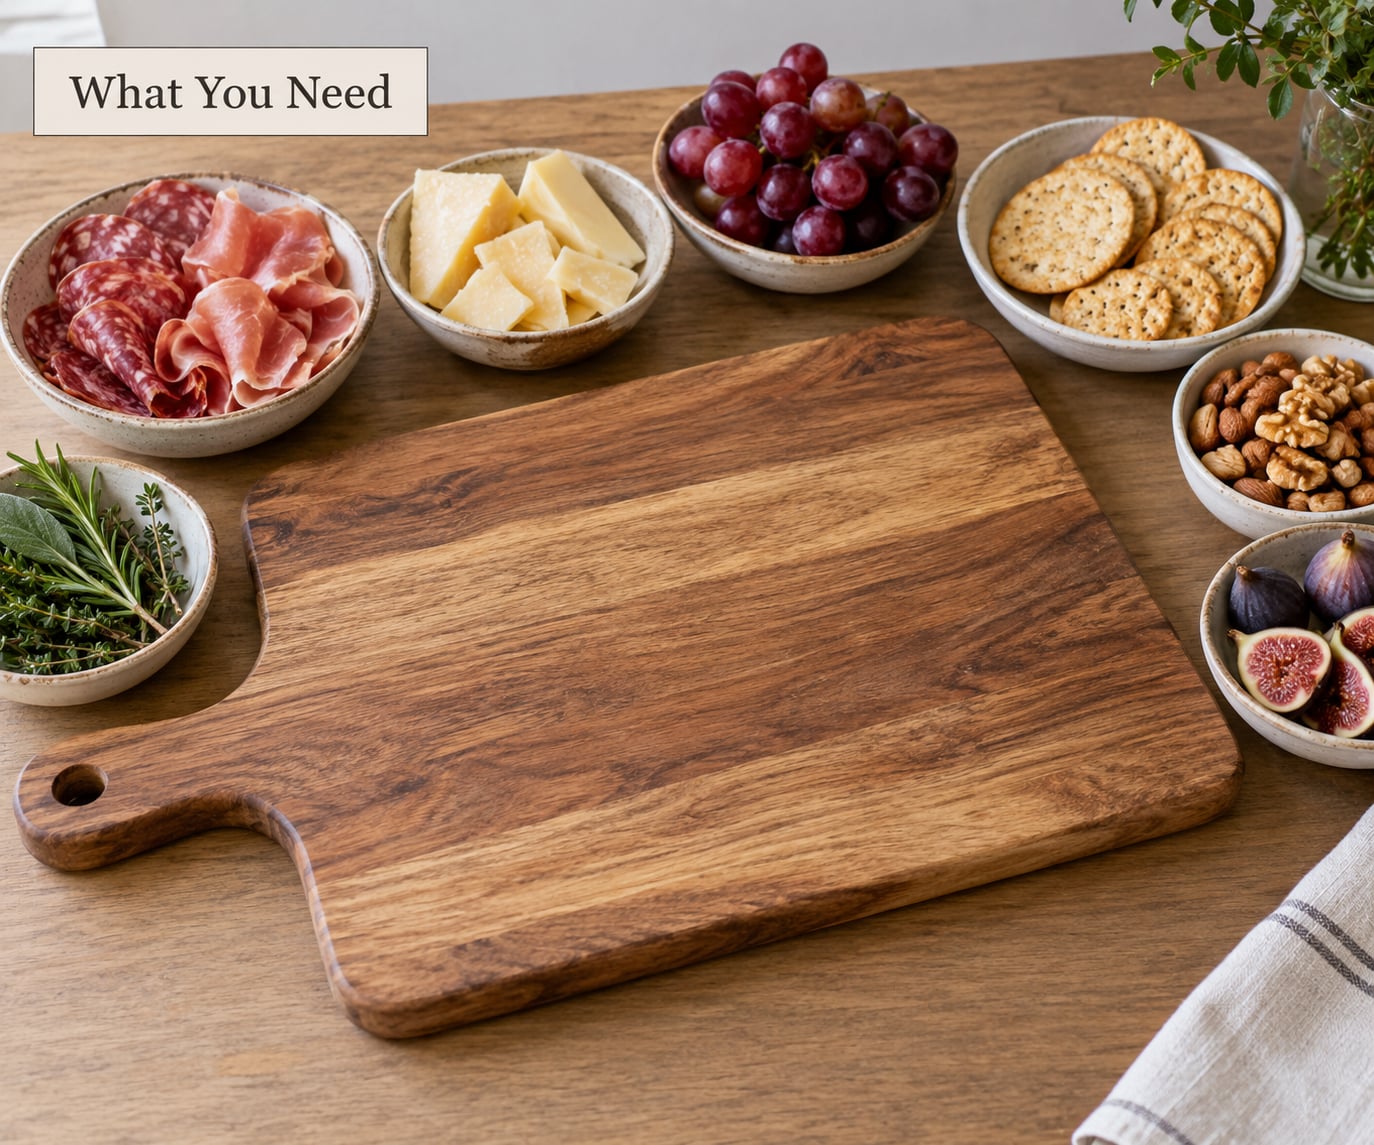
You do not need a specific shopping list. You need one item from each of these categories, plus three or four cheap fillers.
- The board: a wood or slate board whose surface roughly matches your guest count. Platter-edge ceramic works too, though wood hides crumbs better.
- Proteins: two to three cured meats, such as salami, soppressata and prosciutto. Two is plenty for six guests, three for a larger group.
- Cheeses: two to three, chosen across texture rather than type. One soft and creamy (brie or brie-style), one firm and crumbly (aged cheddar, manchego, pecorino), and one sharp or tangy (goat cheese).
- Fruit: grapes, figs, sliced apple or pear, and one berry or stone fruit for a color pop. Two fruits give you both a cluster shape and a sliced shape.
- Crunch: two crackers or breadsticks, ideally one pale and one seeded or dark. Add crostini if you want a third shape.
- Spreads: mustard, honey, jam or chutney, plus olives or pickles.
- Gap fillers: Marcona almonds, dried apricots or figs, breadsticks, extra crackers. These do most of the space-filling work.
- Garnish: fresh herbs (rosemary, thyme, basil), a few peppercorns, and optional edible flowers.
- Tools: a small knife or cheese wire, serving tongs or a fork for each item, and 2 to 4 small bowls or ramekins.
Portion guidance matters more than variety. Plan on two to four ounces of cheese and two to four ounces of cured meat per person, which shrinks if a dinner is also being served.
| Guests | Board size | Cheese per person | Meat per person | Distinct items |
|---|---|---|---|---|
| 4 | 12 x 8 inch | 3 oz | 3 oz | 8 to 10 |
| 6 | 14 x 10 inch | 3 oz | 3 oz | 10 to 12 |
| 8 | 18 x 12 inch | 3 to 4 oz | 3 to 4 oz | 12 to 14 |
| 10 | 20 x 14 inch | 3 to 4 oz | 4 oz | 14 to 16 |
| 20 | Two boards or a grazing table | 4 oz | 4 oz | 16 to 20, plus a refill tray |
The most common reason a board looks sparse is a board sized for far more people than are actually eating from it. If you are serving eight, an 18 by 12 inch board looks generous; a 24 inch plank will look half empty at the same amount of food. If you already own an oversized board, use it for a grazing table with duplicate items rather than a single layer.
Step-by-Step
How to build a charcuterie board that looks full with varied portions
Look full and well stocked come from volume plus contrast, not from more item types. Six items placed generously fill more space and look more appetizing than fifteen items scattered thinly.
- Four to six guests: 2 meats, 3 cheeses, 2 fruits, 2 crackers, 1 spread, 1 bowl of olives. That is roughly 10 to 12 elements.
- Eight to ten guests: 3 meats, 3 cheeses, 3 fruits, 3 crackers, 2 spreads. Roughly 14 to 16 elements.
- Twelve or more: 3 meats, 4 cheeses, 4 fruits, 3 crackers, 3 spreads, plus a second tray of crackers and nuts that you bring out later.
Repeating an item is fine, and useful. A second small mound of the same salami in a different zone fills a corner and reads as abundance rather than monotony, especially if the two piles are cut differently. Three cheeses repeated in three spots is a common professional move. Fourteen completely different items on one board is just hard to eat from.
Group like with like, then vary the volume inside each group. A small tight cluster of five olives looks better than a wide smear of thirty scattered across the board.
Step 1: Plan the board around color and contrast
Map your food to a color palette before you touch the board, aiming for at least three contrasting colors plus something green.
- Pale: water crackers, brie, mozzarella, apple slices, nuts.
- Dark: cured meats, dried figs, dark chocolate, seeded crackers, olives.
- Red and orange: salami, prosciutto, apricots, roasted red pepper, smoked paprika dusted crackers.
- Green: grapes, herbs, pickles, brussels sprouts, arugula.
- Creamy: goat cheese rounds, whipped butter, cheeses with a pale rind.
Place a dark item next to something pale and a red item next to something green. Side by side, both read brighter and more distinct. Set similar colors apart from each other instead, and they blur into one mass that takes up less visual space than you think.
Pick one hero item to anchor the composition. A whole cheese with a cut face, a small jar of olives or a stacked bundle of breadsticks works, and everything else arranges around it rather than competing with it.
Step 2: Use a mix of shapes, sizes, and textures
Shape does more for perceived fullness than quantity. Cubed cheese of one size looks like a pile of dice; wedges, rounds and torn chunks make the same amount look generous.
- Meats: fold salami into loose ribbons or a rosette, roll it around the end of a knife, or lay thin prosciutto in a rippling wave rather than flat overlapping discs. Folded meat occupies vertical space that flat slices never will.
- Soft cheese: leave brie in a whole wedge with the cut side facing out, or slice it into thick half-moons.
- Firm cheese: cut wedges and a few broken chunks. Ragged edges read as more abundant than neat triangles.
- Crackers: lean them in a stack at an angle, or stand a few upright in a small cup. Vertical crackers fill a gap that would swallow a flat pile.
- Fruit: keep grapes and berries in clusters on the stem or in the bowl, and fan apple or pear slices in a curved line.
- Small items: nuts, peppercorns and dried fruit can be spooned into small piles or thin trails rather than one bowl, which lets them fill gaps instead of sitting in one spot.
Texture works the same way. A board with only soft items looks flat in every photo. Include something crisp, something chewy and something creamy, and the eye reads variety even when it cannot name the difference.
Step 3: Arrange in sections instead of scattering everything
Group your foods into clear zones and keep the categories separate. Sectioning looks intentional, keeps related items together, and stops small gaps from looking like mistakes.
Sketch a rough map on your phone before you start. For a rectangular board: one large anchor zone near the center, cheeses along one side, meats along the opposite side, fruit in the corners, crackers and crunch filling the open stretches, and small bowls placed in the leftover pockets.
Leave negative space on purpose. Roughly 15 to 20 percent of the surface showing is what signals that the board has room, which is part of why it looks generous. A board packed edge to edge reads as stuffing rather than abundance, and guests hesitate because no one can tell where to start.
Repeat your hero or most popular item in two or three spots. Two small amounts of the same well-liked cheese read as plentiful; one large amount reads as all you have.
Step 4: Add height and fill the empty spaces
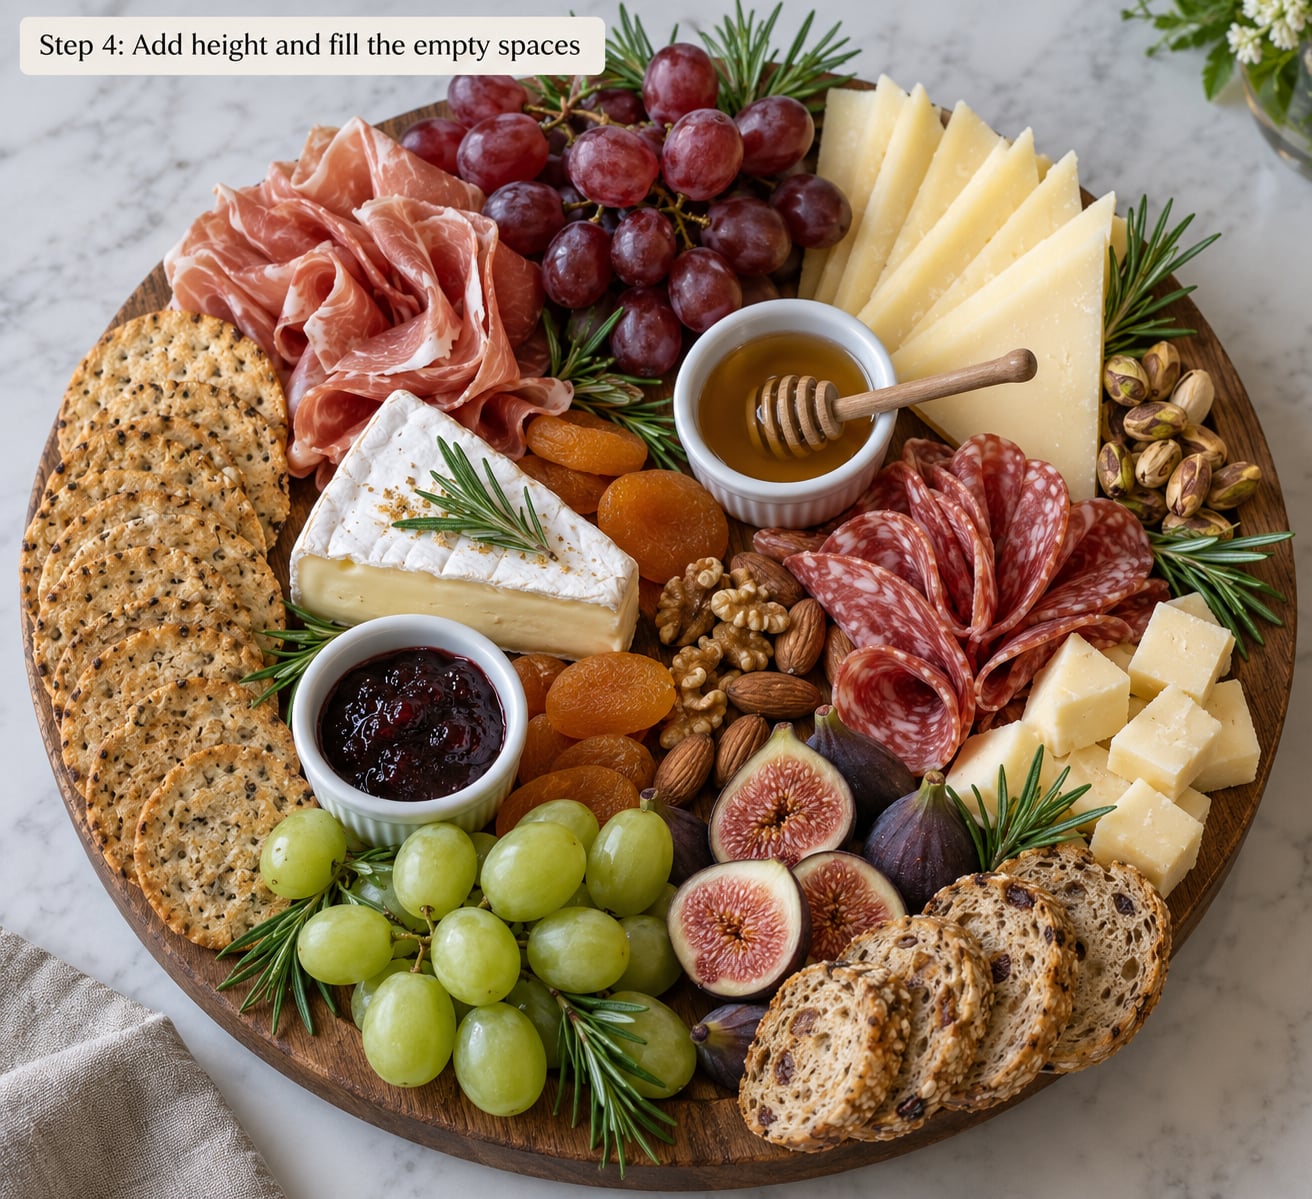
Height is what stops a flat board from looking like an empty tray with crumbs on it. Anything that stands above the surface adds volume to the photo, and volume is what people read as full.
- Folded or rolled meat rises about half an inch and casts a small shadow.
- Stacked crackers at an angle, or breadsticks standing in a jar, create a second layer.
- Small bowls and ramekins hold mustard, honey, jam, olives, pickles and nuts. A bowl sitting on the board reads as an object with mass, and the circle breaks up rectangular shapes.
- A whole cheese, a cheese ball or a small stacked tower gives the composition one high point.
- Long items angled across a corner, such as breadsticks or a prosciutto ribbon, bridge two zones and kill a gap in one move.
Fill awkward corners last. Corners read as problems when they are empty and as intentional when they hold one tight cluster. A small mound of Marcona almonds, a few folded salami slices, three figs or a few sprigs of rosemary tucked into the curve handles it. Repeat that trick along the board edges, where slices often fall short of the rim.
The cheap fillers are worth planning around, because they cover a lot of surface without adding much cost: Marcona almonds, dried apricots and figs, extra crackers, breadsticks, mixed olives, cornichons and pretzel pieces. Anything small and spoonable can be placed in a thin line or a tight pile rather than a bowl, which lets it tuck into gaps a bowl would not fit.
Step 5: Finish with fresh and edible garnishes
Fill the last visual gaps and tie the palette together with fresh items. Rosemary, thyme or basil sprigs laid along a bare stretch add a green line in a second. Peppercorns scattered thinly over pale cheese give it texture and a dark speckle.
Honey or mustard in a small jar with a dipper reads as generous, and the jar handles its own portion control. Edible flowers, used sparingly, add a spot of color that no cheese or cracker can. Cornichons or pickled okra give a briny acidic note next to all that fat, which people notice more than they expect.
Put serving utensils out with each item and keep spare crackers, nuts and dried fruit on a kitchen counter tray. When you bring the tray out at the halfway point, the board looks as full as it did when guests first arrived. Nothing undermines a styled board faster than an hour of picking over with an empty corner showing.
How far ahead can you assemble a charcuterie board?
Prep the components ahead, then assemble close to serving. Cut cheeses, portion meats and mix any dry elements two to three hours in advance and refrigerate them covered. Arrange and garnish no more than an hour before guests arrive, since cut cheese and exposed meat dry out, and crackers go soft sitting against moist cheese.
For food safety, treat the board like any other perishable spread. USDA guidance is to keep perishable foods such as cheese, cured meat and cut fruit at or below 40 F, and to discard anything that has been sitting out longer than two hours, or one hour if the room is above 90 F. Serve the rest of the party cold and put leftovers back in the fridge within that window.
Common Mistakes
Almost every disappointing board comes down to one of these.
- Too many unrelated items. Fourteen items on a small board means everything is a thin smear. Cut back to six or seven core items and give each one real presence.
- One heap in the middle. Food dropped in a single pile leaves the edges empty and reads as sparse from every angle. Section it.
- One cracker type. A single stack of the same cracker is the flattest thing on any board. Add a second, differently shaped option and stand some of it up.
- Everything in even cubes. Uniform dice remove the visual interest that makes food look generous. Use wedges, rounds, torn chunks and folded ribbons.
- Overcrowding. Packing every inch of surface makes the board look like stuffing and slows guests down. Keep about 15 to 20 percent showing.
- No height anywhere. A board that is entirely flat photographs as nearly empty no matter how much food is on it. Add at least three tall elements.
- Ignoring dietary restrictions. Ask in advance, then plan the layout around it. A labeled zone of nuts and crackers that is fully separate from the cheese and meat keeps the board generous and usable, rather than leaving half of it untouchable.
One more worth mentioning: not every charcuterie enthusiast agrees this is worth the effort. Some home cooks argue a grazing table is mostly a way to display food you would otherwise serve in bowls, and that guests would rather have a proper meal. Where I land is that a board is genuinely useful for a party where people are moving around and grazing, and questionable as the centerpiece of a sit-down dinner.
Frequently Asked Questions
What is the 3-3-3 rule for charcuterie boards?
The 3-3-3 rule is a simple starting ratio for a balanced board: three cheeses, three meats and three accompaniments such as fruit, crackers or nuts. It works well for a group of six to eight, because each category gets enough variety to feel generous without the board turning into a pile of trivia. Scale it up by adding one item per category for every extra few guests.
How to make a charcuterie board look full?
Use fewer items, but arrange them in clear zones with even visual weight across the whole surface. Mix contrasting colors, cut foods into varied shapes and sizes, add height with folded meats, stacked crackers and small bowls, and fill corners and edges with small clusters. Leave roughly 15 to 20 percent of the surface showing so the board still reads as generous rather than stuffed.
Should I use a smaller board so the charcuterie looks fuller?
Usually yes. A board larger than your guest count needs is the single most common reason a charcuterie board looks sparse. Plan roughly two to four ounces of cheese and two to four ounces of meat per person, then pick a board whose surface those amounts actually cover. If your board is oversized, use it as a grazing table and duplicate items instead of stretching the food thin.
How far ahead can you put together a charcuterie board?
Prep components two to three hours ahead and refrigerate them covered, but assemble and garnish within about an hour of serving. Cut cheese and exposed meat dry out, and crackers soften when they touch moist cheese. Keep perishable items at or below 40 F, and follow the two-hour rule: discard perishable food left at room temperature longer than two hours, or one hour above 90 F.
How much charcuterie do I need for 20 people?
For 20 guests, plan on four ounces of cheese and four ounces of cured meat per person, which is eight to ten pounds of each across a full spread. That is too much for one small board, so use two boards or a grazing table with around 16 to 20 items. Keep crackers, nuts and dried fruit on a separate refill tray you bring out later.
What is the best finish for wood charcuterie boards?
Use a food-safe mineral oil or board cream, never a cooking oil, and reapply every few months. Cooking oils such as vegetable, olive and coconut go rancid and can smell off once the board warms up. Wash the board with soap and water, dry it upright, and never soak it. A hardwax oil blend adds extra water resistance without sealing moisture into the wood.
Conclusion
Start by cutting the item list. Pick six or seven things with real contrast in color and texture, buy generous portions of those, and match the board size to two to four ounces of cheese and meat per guest. From there, group into zones, vary the cut shapes, stand at least three things upright, fill the corners with small clusters, and keep a refill tray in the kitchen. That combination is what makes a board look full in the room and in the photo.