Proofing yeast takes five minutes and tells you in advance whether your packet is still alive. This is how to proof yeast and know it is alive: stir 2 1/4 teaspoons of active dry yeast into 1/4 cup of lukewarm water with a small pinch of sugar, wait 5 to 10 minutes, and look for a frothy layer of foam and a domed surface. If that foam never appears, the yeast is dead and your dough will not rise.
I have ruined more batches of dough than I care to admit, and almost every one of them traced back to yeast I never checked. Five minutes of testing would have saved every one of them. Here is exactly what to look at, what to watch for, and what to do when nothing happens.
Table of Contents
- What You Need
- Step-by-Step
- Step 1: Prepare the Yeast Mixture
- Step 2: Wait for the Foam Test
- Step 3: Confirm the Yeast Is Ready and Know It Is Alive
- Step 4: Use or Store the Proofed Yeast
- Common Mistakes
- Frequently Asked Questions
- How do you know if yeast is alive before using it?
- What does active yeast look like when it is proofing?
- How long should I proof yeast in warm water?
- Can I use instant yeast without proofing it first?
- What temperature is too hot for proofing yeast?
- Conclusion
What You Need
You need less than most people expect. A small bowl or mug with a flat bottom, a teaspoon, a kitchen thermometer, and roughly a quarter cup of water is the whole list.
- Active dry yeast — one packet, about 2 1/4 teaspoons (7g). Instant and rapid-rise yeast do not need proofing.
- Lukewarm water — 1/4 cup (60ml), measured at 100 to 115°F (38 to 46°C).
- A teaspoon of sugar — anywhere from 1/2 to 1 teaspoon. A pinch of honey or a tablespoon of flour works too.
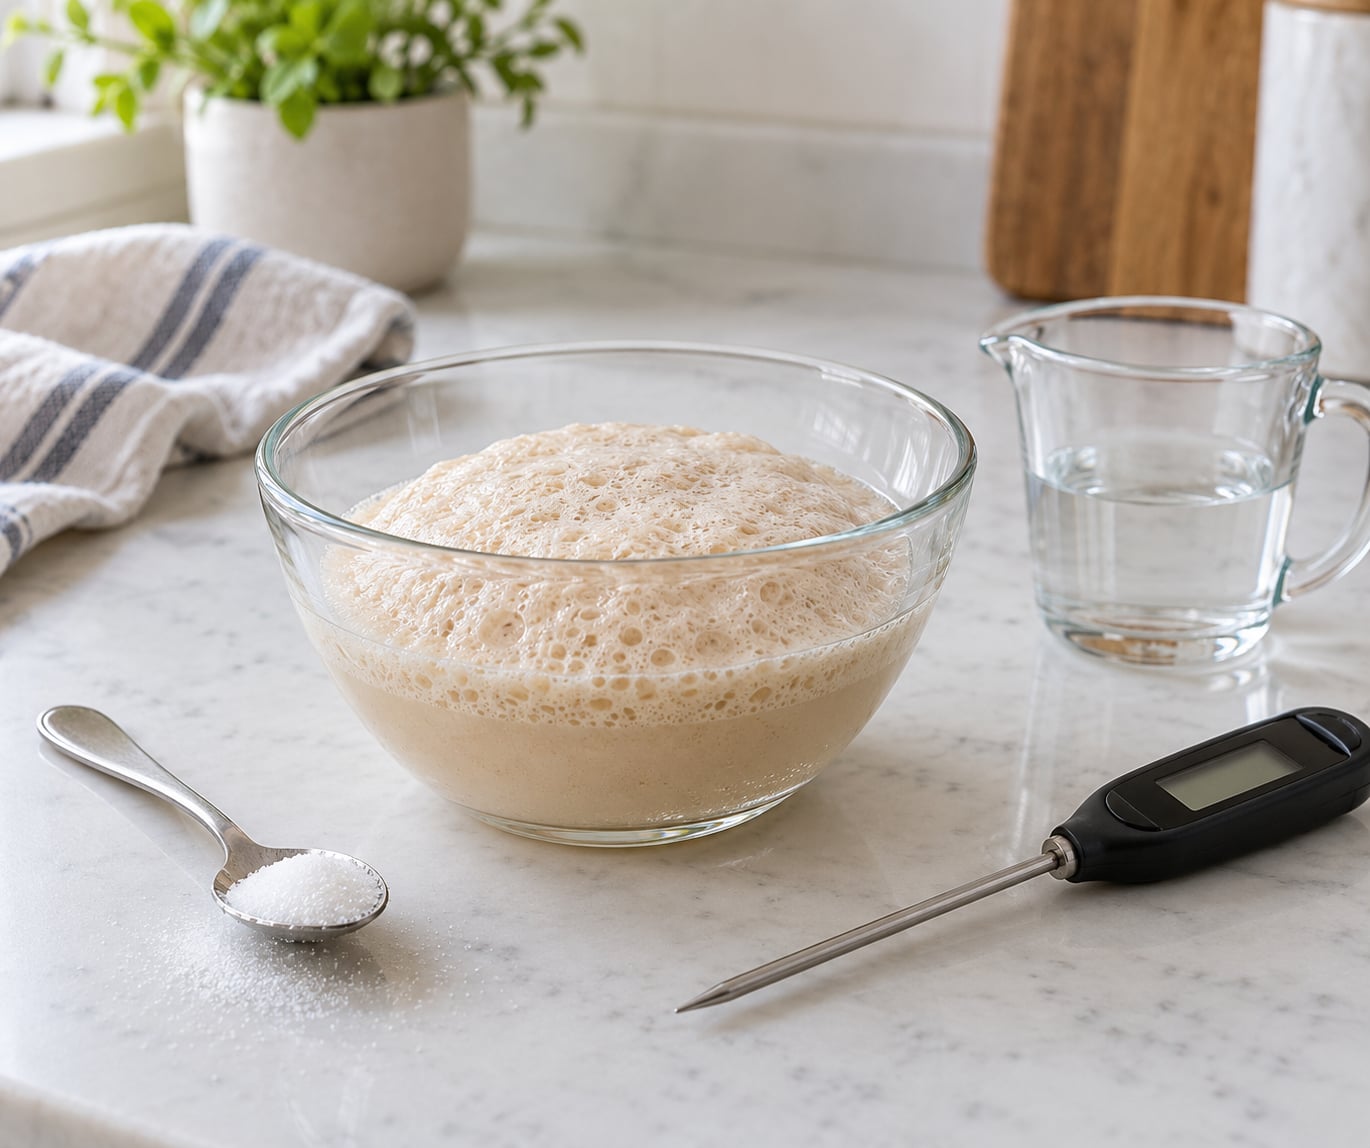
- A clear glass bowl or mug — glass matters, because you need to see the foam against the side.
- A kitchen thermometer. This is the one tool that buys you the most. Guessing at “warm but not hot” is how most yeast gets killed.
Use a container tall enough that you can watch the foam rise up the sides. A shallow dish hides the very signal you are testing for.
Step-by-Step
Step 1: Prepare the Yeast Mixture
Warm 1/4 cup of water and check it with the thermometer. The window is 100 to 115°F (38 to 46°C), and anywhere inside that window works.
Pour the water into your bowl and stir in 1/2 to 1 teaspoon of granulated sugar until it dissolves. The sugar is food for the yeast, not part of the test itself, and dissolved sugar gives the yeast a clean start rather than gritty crystals sitting at the bottom.
Now sprinkle the yeast evenly over the surface and stir gently just until the water turns cloudy. Too much stirring knocks air out and slows the whole thing down.
For active dry yeast, this rehydration step matters. The dried granules need water and time to come back to life before they can do any work in your dough. If you are working with instant yeast, skip all of it and go straight into the flour.
Step 2: Wait for the Foam Test
Set the bowl somewhere warm and still, and leave it alone for 5 to 10 minutes. No stirring, no blowing across the top, no moving it to a different shelf.
What you are watching for in that window:
- A layer of fine white foam or froth across the surface
- Bubbles clustered along the edges where the liquid meets the glass
- A rounded, domed top that rises a little above the original water line
- A faint sweet, yeasty smell when you lean over the bowl
The rise is usually obvious by minute three and unmistakable by minute five. Slow or older packets can take 15 to 20 minutes before anything convincing shows up, so do not panic at the four-minute mark.
Step 3: Confirm the Yeast Is Ready and Know It Is Alive
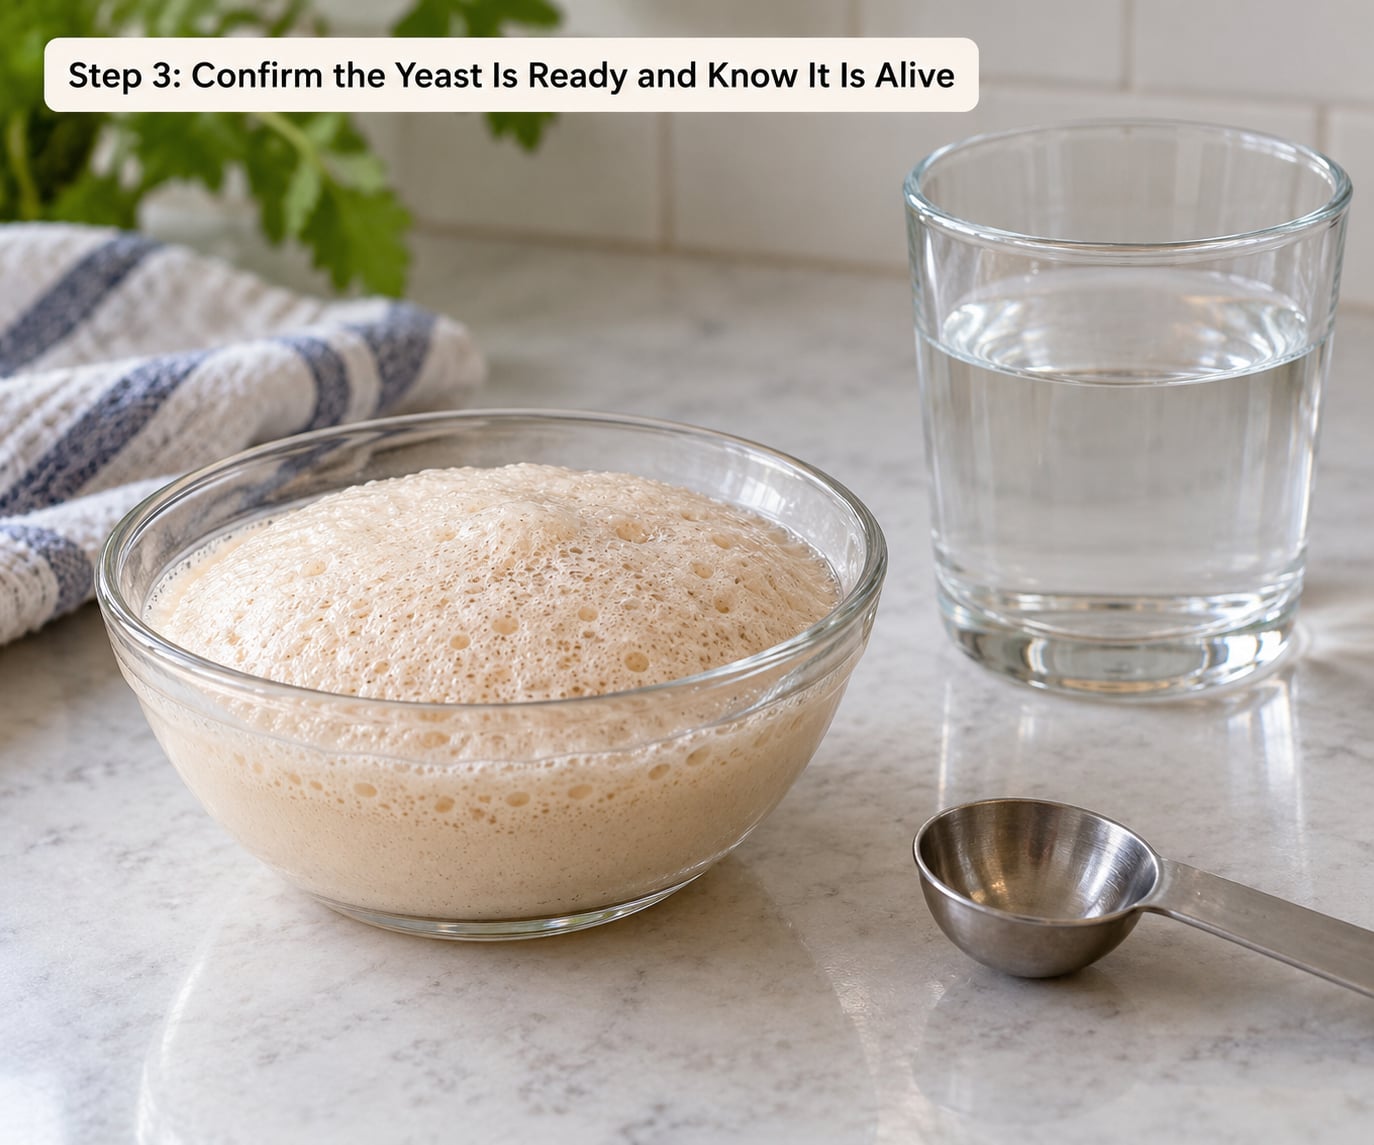
A stable foam layer that holds its shape when you tip the bowl slightly is the pass signal. It should look creamy and puffy, with the liquid underneath still and cloudy. That dome is how you proof yeast and know it is alive without a single extra tool.
Clumps at the bottom are not a failure. Yeast poured in too fast tends to sink and ball up, and bakers regularly read that as dead yeast when nothing is wrong. Stir once, let it sit another few minutes, and the clumps usually dissolve into the foam.
Here is the side-by-side most people ask for, since “what should it look like?” comes up constantly on baking forums:
| Sign | Yeast is alive and proofing | Yeast is dead or spent |
|---|---|---|
| Surface | Foamy, frothy layer that domes upward | Flat, clear, or only a few stray bubbles |
| Bubbles | Dense ring of small bubbles around the edge | Bubbles stop appearing after the first minute |
| Texture | Creamy and puffy, thicker than plain water | Thin and watery, yeast sitting in a settled layer |
| Smell | Sweet, bread-like, pleasantly yeasty | Nothing, or a sour and unpleasant odor |
| After 10 minutes | Volume visibly increased | No change from the starting water line |
| Package date | Within shelf life, stored cool and dry | Past expiration, or left open for months |
Ignore bubbles that appear in the first few seconds. Those are just air you stirred in, and they are why a shaking test fools people. Wait for foam that is still growing at the five-minute mark.
Step 4: Use or Store the Proofed Yeast
Once you see foam, use the yeast straight away. Pour the mixture into your flour and other dry ingredients and mix as your recipe directs. Waiting an hour is usually fine, but proofed yeast slowly loses vigor, so mixing it in right away gives you the best rise.
Instant yeast never needs this test. It is designed to hydrate on contact with wet ingredients, which is why it can be mixed straight into the flour. Proofing it first gives it a head start it does not need.
If your yeast is already sitting in a bowl of flour, you can still test it. Moisten a small handful of that dough with warm water and sugar, wait 10 minutes, and see if it foams. A separate small sample is cleaner, but it does confirm the yeast in the mix.
Proofed yeast is a one-use ingredient. Bake with it now, or discard it and start fresh with a new packet if you have already let it sit for hours.
Common Mistakes
The temperature window is where most proofing attempts fail, so here is what happens at each range:
| Water temperature | What happens |
|---|---|
| Below 90°F (32°C) | Yeast is dormant and sluggish. Expect a very slow start or nothing at all within 10 minutes. |
| 90 to 100°F (32 to 38°C) | Slow but workable. Old packets can still foam here, just later. |
| 100 to 115°F (38 to 46°C) | The ideal window. Active yeast wakes fast and foams reliably. |
| 115 to 130°F (46 to 54°C) | Rising gets unreliable. Some strains survive, many do not. |
| Above 130°F (54°C) | Activity stops. Yeast is dead on contact and cannot be revived. |
Water too hot. This is the number one self-inflicted failure. Boiling water or a microwaved mug straight from the stove kills the yeast before the test even starts, and you end up baking a dense brick. If you do not have a thermometer, use water that feels like a warm bath, not a hot drink.
Sugar mistaken for activity. Undissolved sugar on the bottom of the bowl can look like foaming when the yeast never woke. Stir it in fully before the yeast goes in so what you see is gas and not granules.
Testing too little yeast. A single pinch of yeast in a full cup of water may be too dilute to show anything obvious. Use a proper packet, or at least 2 teaspoons per quarter cup of water.
Expired yeast. Old yeast is not dangerous, it is simply inactive. If the packet is past its date and nothing foams after 20 minutes, throw it out and replace it.
Bubbles before the clock starts. Bubbles from stirring or from dissolving sugar say nothing about viability. Time the wait from when you add the yeast.
The float test. Dropping a spoonful of yeast into water to see if it floats is unreliable and not worth your time. Yeast granules trap air unevenly regardless of whether they are alive, so the test gives false results in both directions. The foam test is the reliable one.
And the frustration most bakers hit next: the yeast proofed beautifully, and the dough still did not rise. That is usually not the yeast. Salt poured directly on dry yeast before liquid arrives can stall it, so sift the salt with the flour first. A cold kitchen slows fermentation, as does an over-tight dough that the gas cannot escape. Proofing the dough in a warmer spot, roughly 75 to 80°F, fixes most of these cases.
Frequently Asked Questions
How do you know if yeast is alive before using it?
Stir 2 1/4 teaspoons of active dry yeast into 1/4 cup of water at 100 to 115°F with 1/2 teaspoon of sugar, then wait 5 to 10 minutes. Alive yeast eats the sugar, releases carbon dioxide, and produces a frothy layer with bubbles around the edge of the bowl. Flat, clear water with no foam after 10 minutes means the yeast is dead and cannot leaven dough.
What does active yeast look like when it is proofing?
Look for a creamy, puffy foam that domes slightly above the water line, with a ring of fine bubbles clinging to the edge of the bowl. The liquid below stays cloudy rather than clear. A sweet, bread-like smell comes with it. Clumps at the bottom are normal and dissolve with a stir, so they are not a sign the yeast died.
How long should I proof yeast in warm water?
Give it 5 to 10 minutes at 100 to 115°F. Most active dry yeast shows foam within three minutes and is clearly working by five. Older or slower packets can take 15 to 20 minutes before the foam is convincing. If 20 minutes pass with no foam and no smell in water that is warm enough, the yeast is spent and should be replaced.
Can I use instant yeast without proofing it first?
Yes, and that is exactly how it is designed to work. Instant yeast hydrates the moment it hits wet ingredients, so you can mix it straight into the flour and skip the warm water test entirely. Proofing instant yeast first is useful only if the packet is old or you want to confirm it is still active before committing a full batch of dough.
What temperature is too hot for proofing yeast?
Anything above 130°F (54°C) is too hot and kills yeast on contact. Water between 115 and 130°F is unreliable, since some strains survive it and some do not. The safe and fast range is 100 to 115°F. Boiling water and microwaved water straight from the cup are the most common reasons home bakers end up with dead yeast.
Conclusion
Proofing yeast is a five-minute viability test, not a step you can skip. Warm water at 100 to 115°F, a pinch of sugar, and a visible foam layer with a domed top after 5 to 10 minutes means your yeast is alive and ready for the dough. No foam at all after a full 20 minutes means it is gone.
Run the test whenever a packet has been open for more than a few weeks, whenever the date is past, and every time you are about to mix a batch you care about. It costs nothing next to a wasted oven full of flat bread.